Made For Play Blog
Explore child development through play, find inspiration for your next DIY project, and discover tips for selecting the perfect toys for your little ones.


Latest Articles

Snow Day Activities for Toddlers
When snow unexpectedly closes the doors of your daycare or preschool, keeping your toddler entertained through the entire day can be tough.You’re stuck inside, and since the roads are probably not safe enough to go grab supplies for new activities, that leaves you with what you already have in the house! To keep you all warm, cozy, and sane, here are some simple snow day toddler activities that add new fun to old toys and supplies! Snow Sensory Bins Your typical sensory bin… but snowy! Use all your usual fillers and tools but add a few scoops of snow from outside. It’s a great way to let kids have fun playing with the snow without actually having to be out in the cold. If you plan to use rice or beans in your sensory bin, just keep in mind that you’ll probably have to throw that batch out after it gets wet from the snow. Animal Rescue Find some of your toddler’s small plastic animal toys (or any small plastic toy) and some masking or painter’s tape. Tape them to a craft table, the floor, or the wall. Then, give your toddler a mission: rescue all the animals! You can criss-cross several pieces to make it tougher for older kids, or leave it simple for younger toddlers. Tape “Obstacle” Courses Tape to the rescue once again. Place lines of painter’s tape on the floor throughout the house and have the kids run along the lines. Leave gaps for them to jump over, swirlys for them to spin around in, and – if they can recognize shapes and follow instructions – place a few extra “shape challenges” on your course like jumping up and down in triangles and crawling over any squares. Older toddlers will probably love creating their own courses too, so hand over that roll of tape if you’re brave enough and see what they come up with. Kitchen DIYs Whether it’s whipping up some chickpea play foam, making baking soda “volcanoes” in jars, or mixing your own finger paint, your kitchen is a treasure trove of new activities (with a little supervision of course.) Our favorites are ones that give the kids something new to play with even after the activity is done like homemade play dough. Once the dough is ready to go, they can take it to their play kitchen and “bake” the day away with cookie cutters and a rolling pin. Crafting This does not have to be fancy. Use whatever you have on hand. You can make cards for family and friends with construction paper, do some finger painting, or make necklaces with yarn and cereal or macaroni. One idea they’re likely to love is “snow day” themed crafts they can decorate their room or the playroom with. Just cut out some snowflakes, string them together, and hang them up! Bath Time Fun Who says you can’t take three baths in one day? Seriously though, water play is often a magical “reset” button for a grumpy toddler, so fill up the bathtub and add a few new elements to make it extra fun. This can be as simple as letting them wear their swimsuits for indoor “swimming” or running a bubble bath. To add some novelty, add plastic toys that are safe for the tub but aren't usually bath toys or any bathtub paint or crayons you have on hand. We love the ideas of using the large, toddler size plastic building blocks in the tub to build floating structures! Fort Building Blanket and couch cushion forts are an old standby! Make them even more fun by incorporating some toys. You can create tunnels and caves to drive their train sets through or secret hideouts for their dolls and stuffies.

How to Teach Sharing Through Play
Activities That Promote Sharing Sharing doesn’t come naturally for toddlers. Putting aside their own desires and prioritizing someone else’s requires a level of cognitive development that most kids won’t fully reach until age 3.5 to 4. But that doesn’t mean we can’t help our kids progress toward sharing and taking turns before that. The sooner we start setting expectations, encouraging sharing, and helping them process big emotions when they don’t want to share, the more likely they’ll be able to share easily and happily as they get older. Here are a few tips adults can use to help toddlers and preschoolers share with their siblings and peers – plus a few activities that make sharing fun for even the most close-fisted kiddos. Think “Long Turns” instead of “Share Right Away” Your three-year-old picks up a toy, and your eighteen-month-old immediately toddles over to grab it. Your three-year-old shrieks, the baby cries, and you remind the older child to share with their sibling. Sound familiar? While this approach to sharing may seem easy to us, for younger kids, it feels unfair and even baffling. And when you really think about it, even you wouldn’t take kindly to someone wanting an item you’d just begun to use. In these cases, it’s best to let the first child who had the toy play with it until they’re finished. Once they’ve left the toy behind, the other child can take their own long turn – no snatching allowed from either kid. This approach to sharing is more in line with toddler and preschooler’s cognitive development. “I can’t snatch something someone else has” is much easier to comprehend than “I must give up the thing I have because someone else wants it.” Help Kids Wait Their Turn Of course, this approach is tough for the child who has to wait their turn. You can help by acknowledging and validating their feelings (i.e. “It’s okay to be upset. Waiting is hard.) and helping them find other ways to play as they wait. Sometimes a little distraction is key to preventing a meltdown. Praise Spontaneous Sharing and Point Out The Positive Consequences Okay, so we get that the “turn-taking” scenario isn’t *exactly* sharing. So when kids do share all on their own, make sure you encourage the behavior with praise (just don’t overdo it) and point out how happy they’ve made their sibling or friend. Doing so will help your child want to share more as they get older. Sharing becomes something they can be proud of and feel good about instead of something adults force them to do. Fun Activities that Promote Sharing To make sharing even more attractive, try out games and activities that make sharing fun! Basketball, Soccer, and Other Team Sports The toddler version that is! All the technical rules are too much for toddlers to understand, but working towards a common goal of passing the ball to each other and getting in the hoop or goal? That they can handle. The more they toss or kick the ball to their peers, the more you cheer! Hot Potato/ Pass the Ball Hot potato is all about not keeping the ball, so it’s great for kids who struggle to give up objects to their friends. If your little ones are too young to understand hot potato, try a simple game of rolling and passing the ball back and forth. Make passes quick and silly to make it seem more fun! Pretend Sharing Even if your kid doesn’t love to share, they’re probably totally fine with their dolls, stuffed animals, and other toys sharing with each other. As you play pretend with your child, you can make up scenarios where both dolls want a turn in the elevator dollhouse or both trains want to go through the tunnel. You can act out the situation together… and of course, you’ll make sure the toys showcase sharing as fun and easy! Roleplay Sharing Similarly, your child might be more willing to share if they’re pretending to be a character rather than themselves. For example, they can be the head chef in their play kitchen who needs to share the tools and food with you, their assistant. Learning to share will take plenty of time and patience from both your child and you! We hope these tips and activities can make that process a little less tear-filled and a lot more fun!

Problem Solving Activities for Toddlers
7 Problem Solving Activities for Toddlers If you have a toddler, challenges like tough homework problems or social dilemmas are still a long way off. But their brains are already working to build the cognitive skills they’ll need to solve life’s “big” problems later on. For now, problem-solving activities – even ones that seem simple to us – can help them boost their cognition, resilience, and creativity. Best of all? These “problems” are actually fun! Here are seven simple problem-solving activities for toddlers and preschoolers you can start trying right away! Memory Games Those little memory card games with matching pictures are great for building concentration, memory, and problem-solving skills in your toddler! Many sets might come with a few too many pairs for a toddler to handle without help, so start with just three to four pairs and see if they can match them up! As they begin to master that, you can add in more and more pairs until they’re working with the entire deck. If you don’t have a deck, you can easily DIY your own with online printables or your own drawings. Shape Sorters Shape sorters are a classic problem-solving toy for young toddlers. In addition to matching the shapes to the correct holes, they’ll also need to figure out why the shapes don’t always fit into the hole, requiring them to rotate the shape or make subtle adjustments to their grip. Sorting/ Grouping by Category Sorting activities are excellent for toddlers’ problem solving and cognitive development, so there’s no need to stop with shape sorters! Set up simple activities that allow them to sort by a variety of categories. This can be as simple as letting them unload the dishwasher silverware tray into the silverware organizer. Or ask them to gather up all the yellow items they see in a room. Puzzles Rotating puzzles is a great way to keep the problem-solving challenge fresh for your toddler. Even a familiar puzzle can present a fun, “new” challenge for your toddler if they haven’t seen it in weeks. Hide the Teddy Bear One cognitive milestone for two-year-olds is the ability to find an object that’s been hidden under two or more layers. Once they’ve mastered that, they’ll be ready for more advanced hiding games. Try hiding a teddy bear or other toy when they aren’t looking and then give them clues to find it. You can start off with basic directions and then progress to tougher clues or games of warmer/ colder. Help Mommy/ Daddy Toddlers love to help, and helping Mommy or Daddy with a problem can be a lot less frustrating than solving their own. For example, if your little one has been determined to put on their own socks lately but always ends up super frustrated, try mimicking the same problem yourself and asking for their help. You can coach them through the process (“Now we need to stretch out the opening of the sock!”), and because their emotions aren’t already running high, they’ll be more likely to actually absorb your tips. You can model how to stay calm through frustrating situations and help them build confidence in their ability to tackle the same problem later. Constructive Play Toys The ability to build a block tower of four or more blocks is actually considered a cognitive milestone for two-year-olds. For three-year-olds, a tower of six or more blocks is the expected milestone. That’s because building anything, even a simple block tower, is a true problem-solving challenge for toddlers. Blocks, train sets, and other building toys let your child work out how to balance, fit pieces together, and deal with frustration as they learn to master the challenge.

How to Help Your Child Focus and Concentrate
Kids aren’t exactly known for their ability to focus for long periods of time. You can chalk some of that up to their natural attention spans (which aren’t that long to begin with). Combine that with our multi-tasking, tech-distracted tendencies, and you’ve got a recipe for kids who struggle to focus for even short periods of time. Thankfully, we can help our kiddos grow their focus and concentration over time with intentional changes to our routines, spaces, and instructions. Here’s what you can do! Take Frequent Breaks Keep in mind that we can only expect kids to concentrate for so long. In general, experts agree that kids should be able to focus for 2 - 5 minutes times their age. So a 5-year-old should be able to focus on a task for 10 - 25 minutes at a time. But this will vary depending on a ton of factors. Kids who are hungry, thirsty, tired, or emotional may have far shorter attention spans. Likewise, if kids have already been focusing for long periods of time throughout the day at school, it may be tougher for them to focus on tough or “boring” tasks at home. One way to help kids reset and restore focus is to take frequent breaks according to their age and attention span at that moment (i.e. tired or “amped up” kids might need more breaks). These breaks can vary by time and activity according to what your kids need at that moment. Kids who need to get up and expend energy will benefit from playing actively outside. Kids who are hungry could use a snack break, etc. With a little time and observation, you’ll learn to pick up on cues from your kids that indicate they need to take a break and come back to the task at hand later. Remove Distractions We probably know to remove external distractions when kids need to focus – turning off screens, reducing noise, keeping the area tidy – but we should try to reduce internal distractions too. Temperature, an uncomfortable chair, or hunger can be just as distracting as the TV. Set Up a “Focus” Space With that in mind, it’s great to set up a space that’s always distraction-free for kids to focus on their homework and other tasks. A kids desk in a quiet area of the house is ideal. Since they’re ergonomically correct for tiny bodies, they’ll help reduce internal distractions like straining to reach a tabletop that’s too tall. Eventually, their brain will come to associate that space with quiet, focused work time instead of eating, playing, sleeping, or watching TV. Focus on One Thing at a Time We’ve all heard it before: multitasking actually reduces performance, and none of us really multitask that well. This is especially true when it comes to kids. They’re probably not trying to cook dinner, listen to a Podcast, and respond to emails at the same time, but they may be trying to lay out all of their homework and jump from task to task. Encourage them to focus on one assignment, one problem, one question at a time without looking ahead or switching to a different task. Break Down Big Tasks When kids find a task overwhelming, they’re more likely to lose focus or give up altogether. Whether it’s cleaning their room or finishing a project for school, help them out by giving them one simple instruction at a time. When that step is complete, move on to the next, taking breaks as needed. Remember, to keep your expectations realistic and stick with good attention-building habits. Overtime, you’ll help your kids develop skills that will help them succeed in school and beyond!

Complete Guide to Preschool
Parenting decisions are tough. Even the little things like choosing a multivitamin can feel ridiculously important. And the big decisions like where and when to send them to school? Talk about pressure. But no worries – we’re here to help! Our Complete Guide to Preschool can help you cut through some of the stress as you pick when and where you send your child to preschool and how to get them ready for the big first day! When Do Children Start Preschool? First, let’s be clear that there is no one right answer! When we think of preschool, we often think of the year right before kindergarten (often referred to as 4K). But preschool can *technically* start at any age. Even childcare facilities that accept infants often refer to themselves as preschools. In general though, what most people think of as “real” preschool activities –i.e. kids making crafts, singing songs, sitting in circles for storytime, and learning letters and numbers – start around two years old. Of course, that doesn’t mean your child needs to start at two years old. While kids do benefit academically from preschool, just one year in 4K is enough to give them those benefits. If you want them to start earlier, that’s great too! No one knows your child, what they need, and what they’ll enjoy better than you. Choosing the Preschool That’s Right for Your Family Full Time vs. Part-Time If you’ve looked up potential preschools, you’ve probably noticed that they describe themselves as full-day, part-time, or morning. Full-time preschools follow regular school hours, while “part-time” usually means school is 3-4 hours in the morning or that you can send your child just 2 or 3 days a week. If you think your child (or you!) aren’t ready for five days a week, part-time options can be great! Educational Models There are so many educational philosophies and pedagogies that we could never list them all, but these are a few of the more popular ones you’re likely to come across: The “traditional” preschool usually involves some circle time, a few teacher-led lessons, time for free play, and enriching activities like music and art. Most public preschools fall under this umbrella, though the exact curriculum will vary from school to school. Montessori preschools are child-led with stations children can choose to “work” at on their own. They emphasize practical life skills and learning through tangible materials. Lessons are often given to just a few students at a time as the classroom “guide” models how to use the materials. In the preschool setting, you’ll find a range of ages in one classroom (usually 3-6), allowing the kids to learn from and teach each other. Waldorf schools are similar to Montessori schools in that they are both child-led and emphasize children’s independence and innate ability to learn. The Waldorf approach places greater emphasis on the arts, fantasy, and children’s imaginations, whereas Montessori tends to focus more on practical life skills. Play-based preschool is an umbrella term. It’s sometimes used to describe Montessori and Waldorf schools, but some play-based preschools don’t specifically follow those philosophies. These schools tend to be less concerned with academic milestones (such as recognizing letters and knowing their sounds) and more concerned with how children develop creativity, confidence, social skills, and pre-academic skills through play. A lack of structured lessons doesn’t necessarily mean it’s a free for all – with thoughtful materials and knowledgeable teachers, kids still grow and learn in play-based preschools. Other Factors to Consider Of course, there are plenty of other factors that will influence your decision. Here are some of the things you might want to consider: Student to teacher ratios Class size What ages can attend Availability of outdoor play areas Approach to discipline Your initial impressions when you meet the teachers and directors Availability of after school care if you need it Food and snack choices Distance from your home Cost We know – tough! If you're struggling to narrow down your options, we recommend making a spreadsheet of all the local schools you’re considering. Make columns for things that matter to you to keep a running list of pros and cons – it’s way too easy to forget which school is which when you’re still in the online research phase. Applying & Registering Once you’ve narrowed your options down, you can start scheduling some tours. Come prepared with questions, take notes, and add it all to that master pro-con list. They’ll likely walk you through the application process and send you home with any relevant forms. Once you’ve made your decision, send in that application ASAP. Preschools usually start accepting applications early in the spring semester for the following year, and spots can fill up fast! Some preschools will perform low-pressure evaluations as part of their admissions process (often just for 4K). They’ll often subtly check children’s fine motor skills by seeing how they hold a pencil, note their social skills, and might ask them to count or recite their ABCs. Once you’ve secured a spot at your preschool, it’s usually just a matter of paperwork before you’re ready to start. Other than the school’s forms, you’ll usually need shot records, copies of insurance cards, and proof of address (if using a public preschool). Preparing for Preschool Now that your kiddo is all registered, what should you do to help them thrive in the classroom? Well, we have good news – you can take the pressure off when it comes to preparing your child for preschool! Preschool is the prep work for kindergarten and beyond, so there’s zero need to make sure they know all the letter sounds or can count to 100 before they go. That being said, you do want to help make preschool a positive experience for them, so try to help them understand what they’ll do at preschool and get excited about it! Read Books about going to Preschool There are a ton of great books that will help kids learn what they can expect at preschool and address any fears they might have about their first day. Rosie Goes to Preschool by Karen Katz goes through an entire typical day at preschool – and makes it look super fun! Preschool, Here I Come! by D.J. Steinberg turns the typical first-day fears on their head as the brave brand new preschooler tells the mom not to cry and that she can go home. In Pete the Kitty’s First Day of Preschool, your kids can see how much fun one of their favorite characters has at preschool. There are tons of other books too, both for purchase and, more likely than not, for free at your library. Meet the Teacher Take advantage of Meet the Teacher nights and school tours. The more familiar your littles are with the people and places they’ll see at preschool, the fewer first-day jitters they’ll have. (Maybe?) Get Potty Training Done So this one definitely depends on your little one’s age. If they’re going to 4K for the first time, potty training is probably way behind you. If they’re attending a two-year-old’s class, most schools won’t require them to be fully potty trained before starting. But three’s – that’s where you might have to get the potty training train rolling. Most schools will require them to be able to use the bathroom independently by the time they enter a three’s classroom, so if it hasn’t happened yet, add it to your preschool prep to-do list (ideally at least a few months in advance). Get Crafty at Home Arts and crafts time is a given at basically any preschool! Of course, you definitely don’t need your littles to be master artists before preschool, but they are likely to feel more confident if they’ve seen similar materials at least once before. If you haven’t already, try introducing simple craft supplies like glue sticks, safety scissors, craft pom poms, popsicle sticks, metal brads, stencils, and stamps at home. You can create adult-directed crafts together and let them get creative and do their own thing – they’ll probably do a bit of both at preschool too. Clean Up, Clean Up Clean-up time is likely to be a part of the day, so it’s always great to practice picking up toys at home. Perfection isn’t the goal – just try to get your child used to picking up with a positive attitude when you transition between activities. (We know that’s easier said than done, so check out our tips on turning kids’ chores into fun!) Your kiddo’s teachers will definitely thank you! Set Up Some Play Dates Under normal circumstances, kids have probably played with plenty of other kids by the time they’re headed to preschool. In the midst of the pandemic, however, those park days and play dates may have been few and far between. If you feel like your child has suffered socially as a result, know that so many parents have the same concerns. Let go of any guilt, and remember that they don’t need perfect social skills (as if that even exists!) before they start preschool. Preschool is the training ground for interacting with peers, so in all likelihood, you’ll see those social skills blossom as the year progresses. If you’re especially worried that they’ll have a tough time starting out, try scheduling a few playdates with a few friends at a time before the first day. You’ll get a chance to see how they do in a group, and you can give their teacher a heads up on any obstacles your child faces when interacting with their peers.

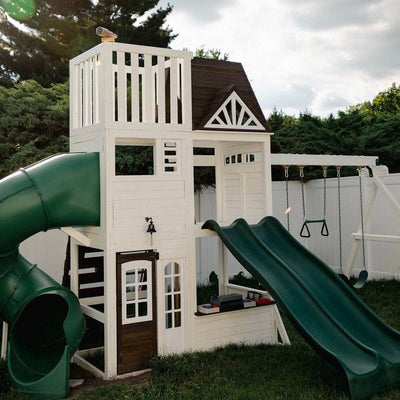
How to Install a Backyard Playset
Playing on a new swing set is fun! Shopping for a new swing set can be fun. But installing a new swing set? Call us crazy, but we think even that can be fun too – if you’ve got great instructions, the right tools, and a little help that is. Our step-by-step will walk you through how to install a backyard playset with minimal frustration… and maybe even a little fun! 1. Choose an Obstacle-free Area for Your Playset The perfect playset spot is free of obstacles like fences, trees, and other objects that could injure a child who falls or jumps off the playset. We recommend leaving six feet of clearance in every direction around your playset or following measurements of the ATSM-recommended safety zone that come with each KidKraft playset. 2. Level the Installation Area You’ll save yourself a lot of headaches if you make sure your installation area is level before you start building your playset. Most of us have slopes, mounds, and divots throughout our yard, so don’t neglect this essential step! Even if you think your yard is level, double-check with these steps: Start by placing stakes in the four corners of the area that needs to be leveled. (Note: You don’t need to level the entire safety zone, just the area where the playset will be installed.) Connect the stakes with a thick piece of string, positioning the string a few inches above the ground. Use a level to ensure that the string is level between each post. The string will serve as your reference point as you level the ground. Use a shovel to dig out the sod, being sure to flatten any raised areas and fill any low areas. You may need additional dirt or sand to fill some areas. When everything looks level and even with the string, you’re ready for a final check. Lay a long, straight board across the ground and place a level on top. Be sure to do this in multiple locations to ensure the entire area is level. See the process in action in this video! 3. Read Instructions & Take Inventory To make the assembly process as smooth as possible, we recommend thoroughly reading the instructions and taking an inventory of the pieces to make sure nothing is missing before you get started. Knowing what and where each piece is will make assembly much smoother! 4. Assemble & Anchor You’ve measured, you’ve leveled, you’ve read the instructions, and now it’s time to get building! This is usually the most time-consuming part of the installation process, so budget an appropriate amount of time and make sure you have all the tools mentioned in the instruction manual before you get started. You’ll also want to enlist the help of a friend or family member – we recommend at least two people work on assembling most KidKraft playsets. For specifics, be sure to continually refer to the instructions included with your playset. 5. Add Protective Loose Fill Always wait to add your protective loose fill material until after the swing set has been securely anchored to the ground. Once it’s in place, it’s time to add the protective loose fill material to the safety zone. You’ll need at least 9’ of material for most playsets or at least 6” if the lowest surface is less than 4’ high. Mulch and woodchips designed for playground use are the most common choices for protective material. Contain it by adding some landscaping edging or digging around the perimeter. 6. Play! FINALLY! All that hard work feels more than worth it kids finally get to play on their brand new playset. Now, your only job is pushing them on the swings and soaking in those smiles!

KidKraft Dollhouse Assembly Tips
When you bring a new KidKraft dollhouse box through your door, one thing’s for sure: your kiddos will be non-stop balls of excitement and anticipation until it’s ready. The only thing standing between them and hours of dollhouse fun? Assembly. But no worries – all KidKraft dollhouses come with easy-to-follow instructions, and we’ve got a few extra dollhouse assembly tips to make the process even easier and faster! Read All the Instructions You’re way less likely to make frustrating mistakes if you give all the dollhouse assembly instructions a quick read before you get started. And don’t worry, it won’t take that long. Most of our instructions are pictures only, so just glancing through will give you a strong idea of what pieces will go where and the order in which you’ll complete each step. If you lose your paper copy, you can find full instructions for all of our current products online! Just find the product page for your dollhouse and download the PDF. Clear a Wide Space If you can create a wide, open space for your assembly process, it’ll be easier to organize all your pieces before you start building. We recommend moving all other toys and objects out of the space (and maybe even temporarily moving small pieces of furniture like your coffee table if needed). With all other clutter out of the way, you’ll be less likely to lose pieces as you work. Inventory and Organize Use all that clear space to take inventory of all your pieces and organize them before you get started. Your instructions will have a detailed list of everything that’s included. Make sure you have everything you should before you start and organize them all into designated spots in your open area. On the off chance that you are missing a piece or something is damaged, get in touch with us right away, and we’ll send you a replacement part ASAP. Have a Friend With your instructions read, your space clear, and your pieces organized, you’re ready to get started! KidKraft dollhouses can be assembled by a single person, but if possible, we recommend having a friend or family member around to help. It’ll be easier to line up large pieces… and make the whole process more fun! Have a Plan for the Kids Depending on the age of your kids, you may want to plan assembly for a time when they’re out of the house or in bed. Younger kiddos are likely to move pieces around (or at the very least ask you every five minutes if it’s ready yet!) If you know they’ll have very little patience as they wait for their dollhouse to be ready, you may want to keep everything top secret until it’s completely assembled and ready to go. On the other hand, older kids may actually be great helpers and enjoy telling everyone “I built it myself!” Reach Out Again, if you have any missing or damaged pieces, let us know ASAP so we can make it right! If you have any other questions, email us at customerservice@kidkraft.com or call us at 1-800-933-0771. We’re always here to help! Still shopping for your perfect dollhouse? Check out our tips for How to Choose the Best Dollhouse for Toddlers!

Engaging Your Child in DIY Projects at Home
By providing hands-on experiences, DIY projects allow children to take risks and learn from their mistakes, boosting their confidence and giving them valuable practice with problem-solving skills, fine motor skills, and creative exploration. Whether it’s something as complex as putting together a birdhouse kit or as simple as a macaroni necklace, kids benefit from the chance to create! Here are some tips to help give your kiddo a can-do attitude when it come to DIY projects at home: Finding the Right DIY Project Finding the right DIY project for kids can be a bit of a Goldilocks situation. You want it just difficult enough that your child is interested in the challenge but not so difficult that it causes them to give up… and triggers a meltdown in the process. Choose projects that are age-appropriate, considering your child’s fine motor development, problem-solving skills, and emotional regulation. When in doubt, Start with simple projects. Starting with easier projects can help build your child's confidence and encourage them to keep going. Plus, it gives you an accurate idea of their current skill level, so you know exactly how much of a challenge they can handle next time. That being said, don’t be afraid to pursue projects that might traditionally be considered too advanced for young kids. Kids get pretty stoked at the chance to use real tools like screwdrivers and hammers or to make a recipe on their own. Just be sure you’re supervising for safety whenever necessary! Setting Up Your DIY Project Space A child-friendly project space sets your kids up for success! But don’t overthink it. Just keep these basics in mind, and you should be good to go: Make it ergonomic Kids will have an easier time focusing on the project if they aren't struggling to stay in their chair or reach their tools. You can use a kid-sized craft table or desk, or just add a booster seat to the dining room table. Whatever you do, just make sure they are comfortable and can reach everything on the work surface. Provide all the (child-sized) tools Before you get started, make sure your kiddo has everything they need within reach. Ideally, those tools will be appropriate for tiny hands. Miniature kitchen tongs, child safety scissors, and child-sized gardening tools will be far easier for your child to handle than their full-size counterparts. Keep it clutter-free Tiny bodies come with tiny attention spans, and clutter does not help. Try to clear everything out of the workspace except for necessary project materials. Executing the DIY Project With the project chosen and the space setup, it’s time to get started on project perfection… or is it? Remember that for your kids, the process is way more important than the end product! As long as they’re having fun, getting creative, and staying safe, the project is a win. Opt for open-ended With that being said, we know kids sometimes have a perfectionist streak that can make enjoying the process hard if the project isn’t turning out as they’d hoped or if they need more help than they want. In these cases, it might be helpful to offer more open-ended DIY crafts for kids. For example, consider a project like making a “stained glass” suncatcher (using bits of colorful tissue paper and contact paper inside of a cutout construction paper frame) lets your child choose which colors to add and how to arrange them but doesn’t need to look a certain way to be a success. You can keep things even more fluid by simply offering a range of craft supplies and seeing what your child does with them. Craft pom poms glued to popsicle sticks? Brilliant. Cutting up strips of construction paper to glue onto a paper plate? Sure, why not? Remember, process over product. Encourage creativity What happens when your child takes the project in a direction that’s not exactly by-the-book? As long as they’re staying safe and not destroying property, let them take the lead! So maybe instead of your cute idea to make animals out of toilet paper tubes, your child simply wants to make a magic telescope by gluing odds and ends to the tube? That is still a win! Prepare your child for the challenges When you do choose a more difficult project that will require some adult help, try to talk to your child beforehand about the challenges they may face and the areas they may need help in. They love the privilege of participating in “grown up” projects like painting the playhouse or planting a real garden. But since there’s less room for error here, just let them know that these are projects where you’ll have to work together as a team and follow instructions closely. Hopefully, this talk will help set their expectations and manage emotions when parts of the project are tricky. Celebrate! Your words of encouragement and interest in your child’s creations mean the world to them. So no matter how those projects turn out, be sure to celebrate your child’s efforts. Try pointing out specific choices they made rather than offering general “good jobs!” And don’t forget to ask them to tell you about the project too – you’d be surprised at what they see in their own “abstract” creations!